
To set up a hydroponic garden, first, gather the necessary equipment and supplies. Then, choose a suitable location, test the water, and set up the hydroponic system.
Hydroponic gardening is a practice that allows you to grow plants without using soil. Instead, plants are grown in a nutrient-rich water solution, providing them with everything they need to thrive. This method of gardening offers numerous benefits, including higher yields, faster growth rates, and the ability to grow plants all year round.
If you’re interested in setting up your own hydroponic garden, this guide will provide you with the essential steps to get started. From gathering the necessary equipment to testing the water and setting up the hydroponic system, you’ll gain the knowledge to create a successful and thriving garden. So let’s dive in and learn how to set up a hydroponic garden.
Choosing The Right Setup
Setting up a hydroponic garden involves careful consideration of the right setup. From selecting the appropriate equipment to creating the perfect growing conditions, this guide will help you make informed choices for a successful hydroponic garden.
When it comes to hydroponic gardening, choosing the right setup is crucial for the success of your plants. By determining the space you have available and deciding on the hydroponic system that suits your needs, you can create an efficient and productive garden. Let’s delve deeper into these key aspects.
Determining The Space
If you’re new to hydroponics, it’s important to consider the space you have available before diving into the setup. Whether you have a small balcony or a spacious backyard, understanding the dimensions of your gardening area will allow you to plan accordingly.
Start by measuring the available space, noting any limitations or challenges that may impact your choice of system or the number of plants you can cultivate. Remember that hydroponic gardens can be set up vertically, making use of wall space or hanging structures to maximize efficiency.
To help you visualize, here’s a table outlining the three main categories of spatial requirements:
| Space Category | Approximate Size | Examples |
|---|---|---|
| Small | Less than 10 square feet | Balconies, small patios |
| Medium | 10-50 square feet | Backyards, roof gardens |
| Large | More than 50 square feet | Greenhouses, dedicated rooms |
Deciding On The Hydroponic System
The next step is to decide on the hydroponic system that best suits your needs and space constraints. There is a wide range of systems available, each with its own advantages and considerations. Here are a few popular options:
- Drip System: This system delivers nutrient-rich water directly to the plants’ root systems through a network of tubes and emitters. It is ideal for large-scale gardens and is known for its versatility.
- NFT (Nutrient Film Technique): In an NFT system, a shallow film of nutrient solution flows over the roots. This system is great for small spaces and is prized for its simplicity.
- Ebb and Flow: Also known as flood and drain, this system periodically floods the plants with nutrient solution, which then drains back into a reservoir. It is suitable for medium to large gardens.
- Aeroponics: In an aeroponic system, the plants are suspended in air with their roots misted intermittently with a nutrient solution. This method allows for maximum oxygenation and is excellent for quick growth.
Consider the space you have available, the type of plants you intend to grow, and your personal preferences when choosing the hydroponic system. Each system has its own set of pros and cons, so take the time to research and select the one that fits your needs best.

Credit: m.youtube.com
Selecting The Plants
When setting up a hydroponic garden, selecting the right plants is a crucial step that can significantly impact the success of your endeavor. By considering the growth requirements and choosing suitable varieties, you can ensure that your hydroponic garden flourishes with vibrant and healthy plants. Understanding the unique needs of different plants will help you create an optimal environment for their growth and maximize the yield of your hydroponic garden.
Considering Growth Requirements
Each plant has specific growth requirements such as light, temperature, and nutrient needs. Understanding these requirements is essential for selecting plants that are well-suited for hydroponic cultivation. Some plants thrive in warm temperatures, while others prefer cooler conditions. Additionally, certain plants may require higher levels of specific nutrients, which need to be carefully monitored in the hydroponic system to ensure healthy growth.
Choosing Suitable Varieties
When selecting plants for your hydroponic garden, it’s important to choose varieties that are known for their adaptability to hydroponic growing conditions. Look for varieties that have a reputation for thriving in soilless environments and are well-suited for hydroponic cultivation. Consider the size of the mature plants, as well as their growth habits, to ensure they can coexist harmoniously within the limited space of a hydroponic setup.
Preparing The Environment
When setting up a hydroponic garden, preparing the environment is crucial for the success of your plants. Creating the right conditions will promote healthy growth and maximize yield. There are a few key factors to consider when it comes to preparing the environment: setting up lighting, controlling temperature, and managing humidity.
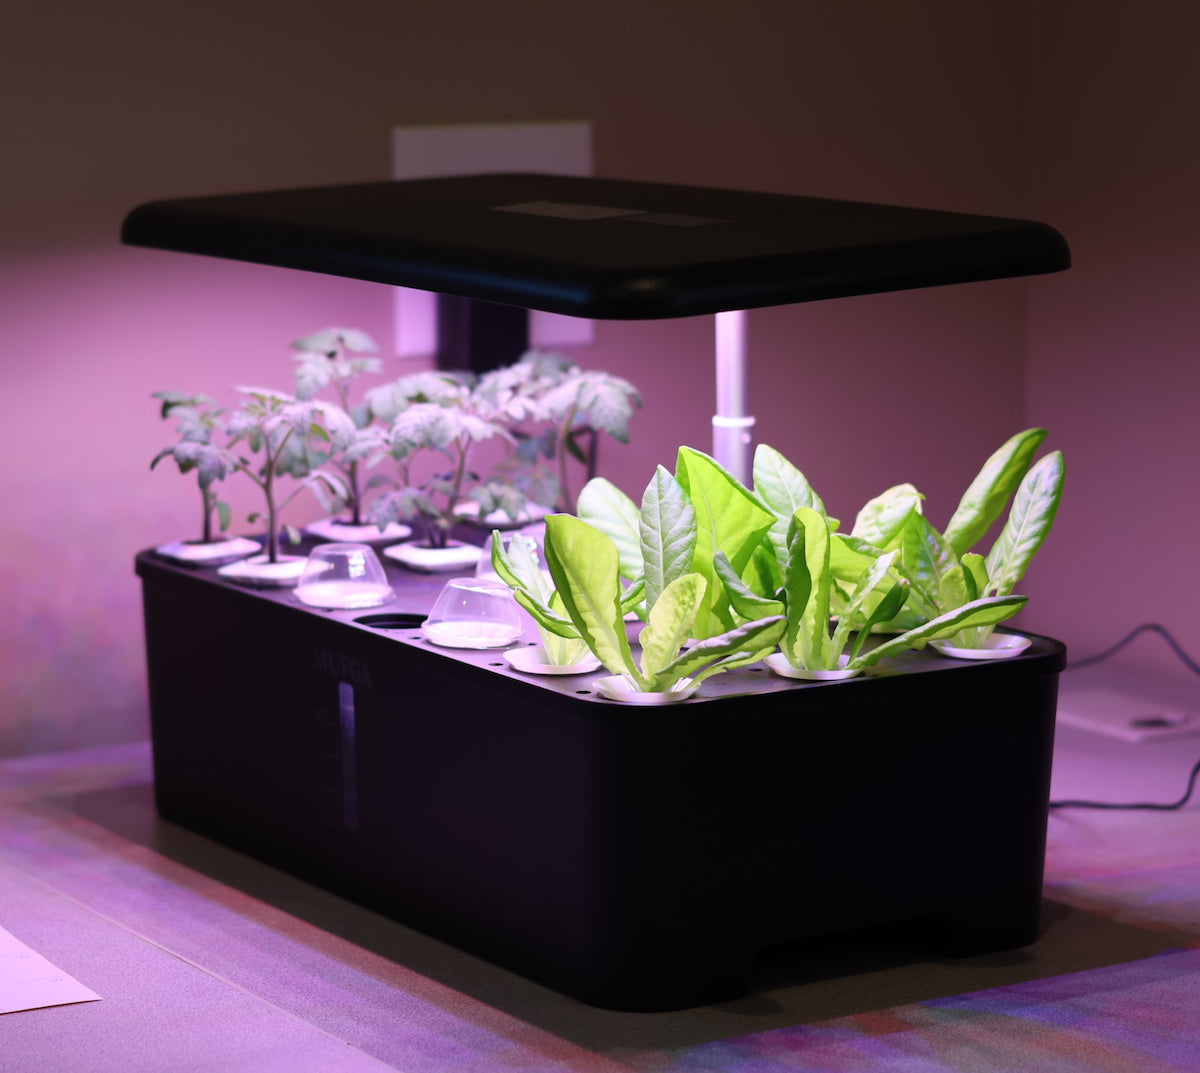
Setting Up Lighting
Adequate lighting is essential for photosynthesis, the process through which plants convert light energy into chemical energy, allowing them to grow. When setting up your hydroponic garden, it is important to choose the right lighting system that provides the ideal spectrum and intensity for your plants.
In general, there are two common types of lighting used in hydroponic gardening:
- Fluorescent lights: These lights are cost-effective and work well for small gardens or plants in the early stages of growth. They emit a cooler light spectrum, making them suitable for leafy greens and herbs.
- High-intensity discharge (HID) lights: HID lights are more powerful and emit a broader light spectrum, including both blue and red light. This makes them suitable for all stages of plant growth, from seedling to maturity.
When positioning your lights:
- Hang the lights at the appropriate height to ensure they cover the entire area where your plants are located.
- Adjust the distance between the lights and the plants as they grow.
- Keep the lights on for an average of 12-16 hours per day, simulating the natural daylight cycle.
Controlling Temperature And Humidity
Temperature and humidity play integral roles in the growth and development of hydroponic plants. Maintaining the right temperature ensures the optimal functioning of enzymes and metabolic processes, while humidity affects transpiration and nutrient absorption. Follow these guidelines to control temperature and humidity effectively:
Temperature control:
- Keep the ambient temperature within a range of 65-80°F (18-27°C) during the day and slightly cooler at night.
- Use ventilators or fans to circulate the air and prevent heat buildup.
- Avoid placing your hydroponic garden near drafts or sources of extreme temperature fluctuations, such as doors or windows.
Humidity control:
- Maintain humidity levels between 50-70% for most plants.
- Place a humidity dome or use a humidifier to increase humidity in dry environments.
- Avoid excessive humidity, as it can lead to fungal diseases and inhibit plant growth. Use a dehumidifier if needed.
Setting Up The System
Setting up a hydroponic garden is made simple with these easy steps. Learn how to create the perfect system for growing plants hydroponically.
Installing The Reservoir
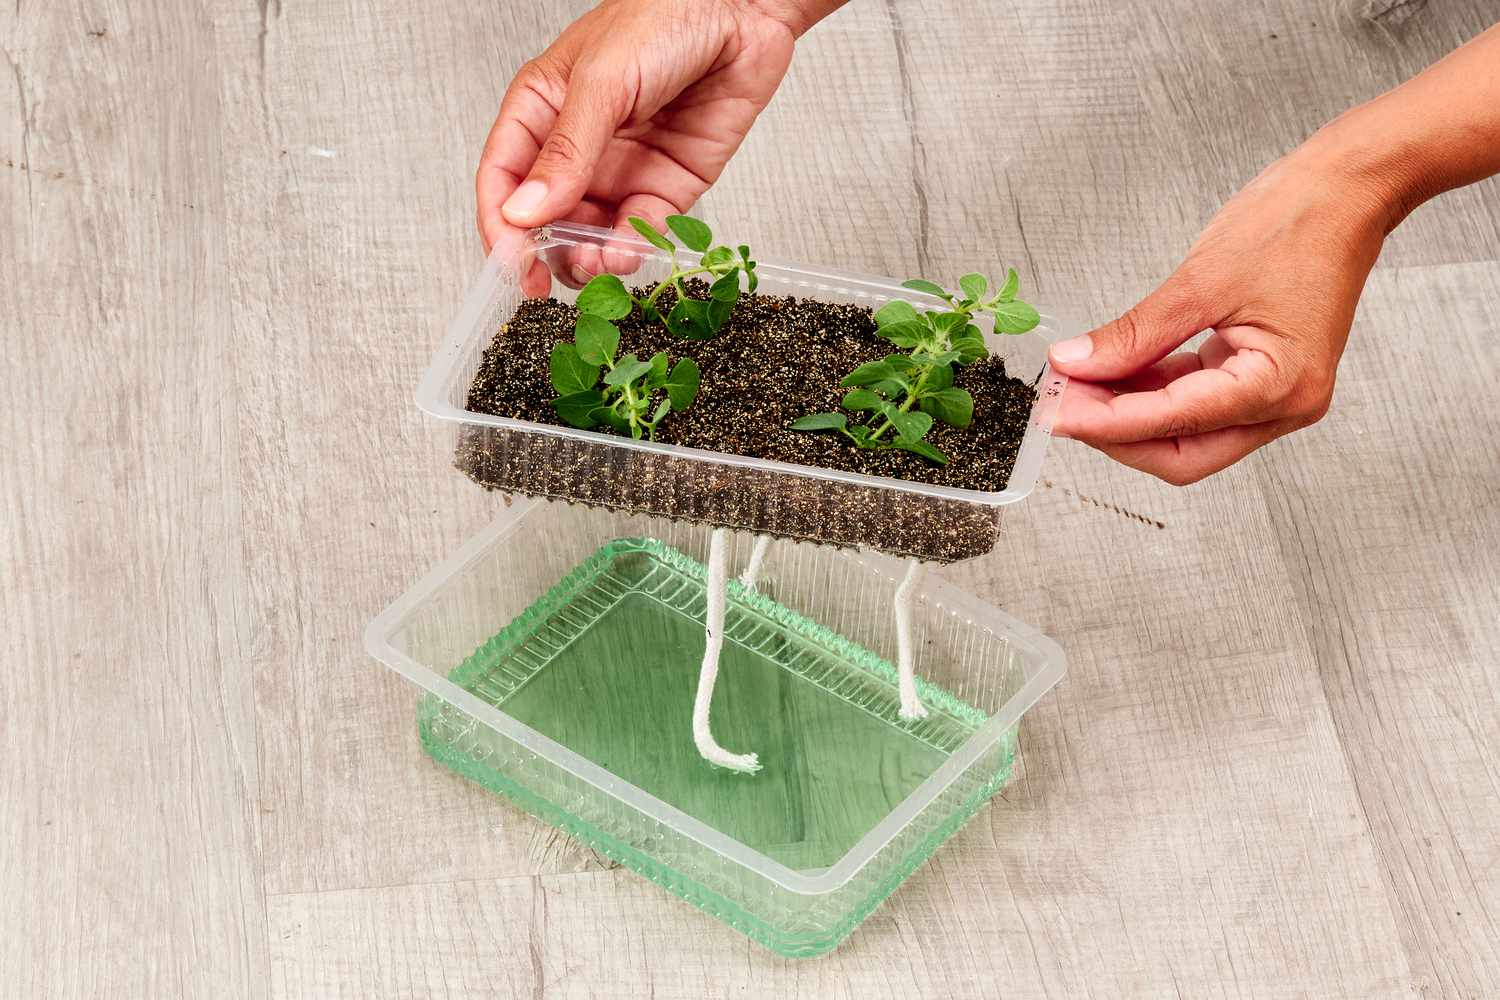
Setting up the reservoir for your hydroponic garden is the first step towards a thriving and efficient system. Here’s a simple guide to help you get started. To install the reservoir, follow these steps: 1. Find a suitable location for your reservoir, making sure it is close to an electrical outlet and within reach of the growing area. 2. Set up a sturdy table or platform to support the reservoir. It should be large enough to accommodate the size of your reservoir and the weight of the water it will hold. 3. Place a plastic or waterproof liner on the table to prevent any leaks or spillage from damaging the surface. 4. Position the reservoir on top of the liner. 5. Ensure that the reservoir is level and stable, adjusting the table or platform if necessary. 6. Fill the reservoir with water, leaving some space at the top to prevent overflow when you add the nutrient solution later.Assembling The Growing Containers
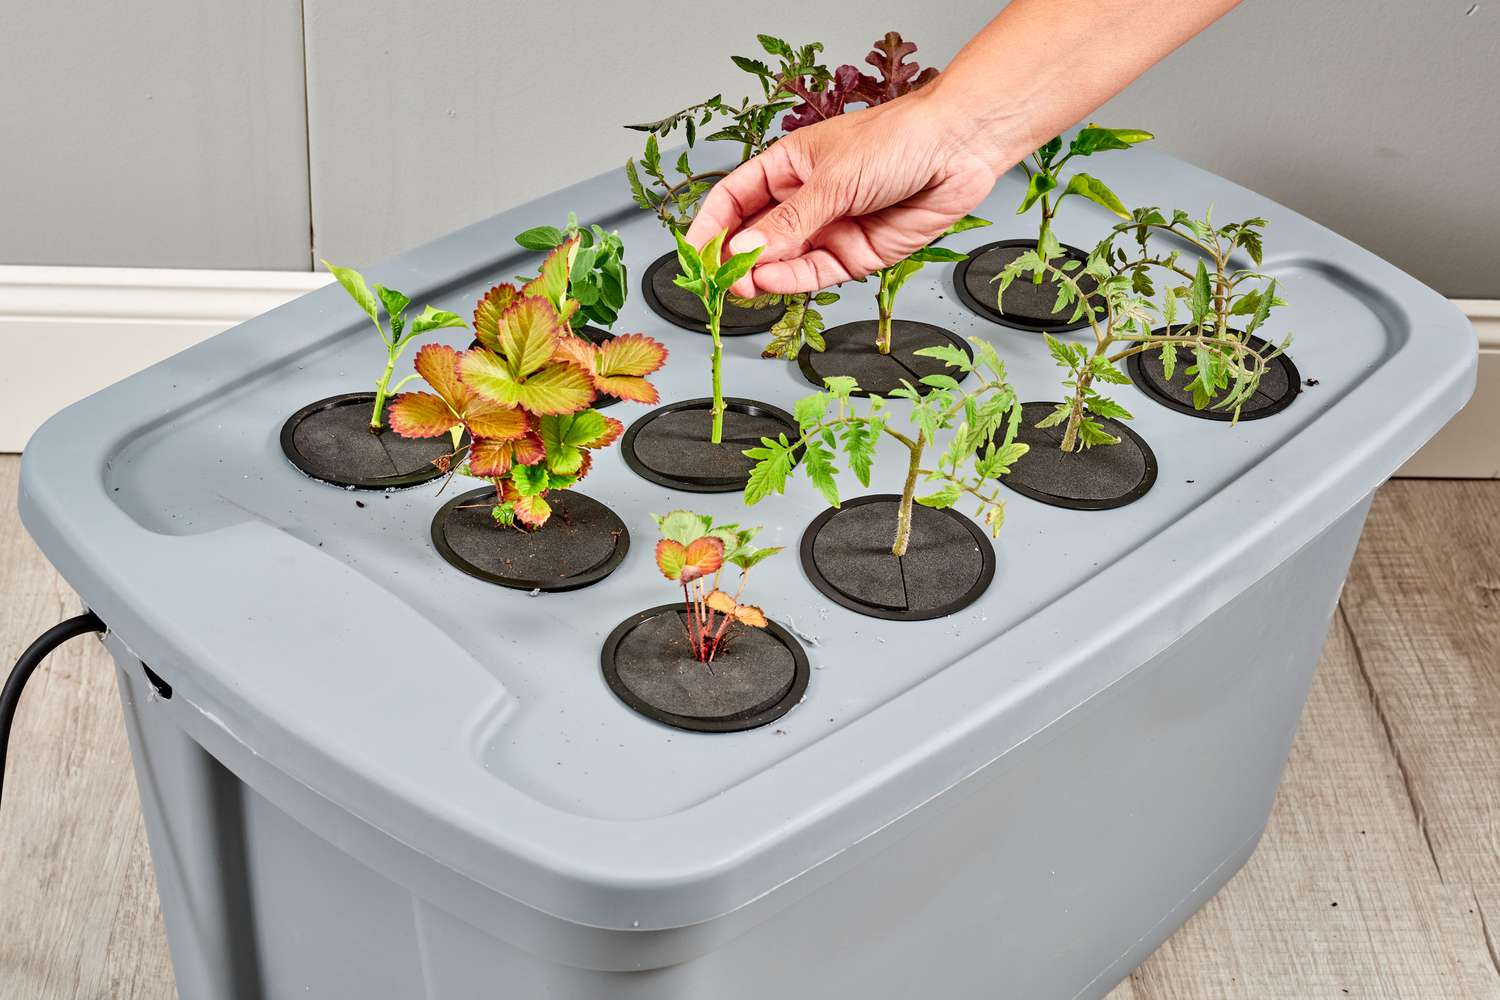
Once you have the reservoir in place, it’s time to assemble the growing containers. Here’s a straightforward process on how to do it. Here is a step-by-step guide to assemble the growing containers: 1. Choose the type of growing containers you want to use, such as buckets, trays, or pots, depending on the plants you will be growing. 2. Ensure that each container has drainage holes at the bottom to prevent waterlogging. 3. Place a layer of growing medium, such as perlite or coconut coir, at the bottom of each container. This will provide support to the plants’ roots and help maintain proper moisture levels. 4. Gently transfer your seedlings or plants into the containers, ensuring that their roots are placed securely in the growing medium. 5. Arrange the containers in a way that allows easy access to each plant for maintenance and harvesting purposes.Connecting The Pump And Tubing
The next step in setting up your hydroponic system is connecting the pump and tubing. Follow these instructions to ensure proper installation. To connect the pump and tubing, follow these simple instructions: 1. Place the water pump at the bottom of the reservoir, ensuring it is securely positioned. 2. Attach one end of the tubing to the outlet of the pump. 3. Position the other end of the tubing inside the growing containers, near the plants. You can use clips or stakes to hold the tubing in place. 4. Ensure that the tubing is long enough to reach all the containers in your system. 5. Test the pump by plugging it into the electrical outlet and turning it on. Check for any leaks or obstructions in the tubing.Mixing And Adding Nutrient Solution
The final step in setting up your hydroponic garden is mixing and adding the nutrient solution. Follow these guidelines to ensure your plants receive the optimal balance of nutrients. Here’s a guide to mixing and adding the nutrient solution to your hydroponic garden: 1. Refer to the instructions provided with your chosen nutrient solution for the appropriate mixing ratio and measurements. 2. Fill a clean bucket with the recommended amount of water. 3. Gradually add the nutrient solution to the water, stirring gently to ensure even distribution. 4. Test the pH level of the nutrient solution using a pH meter or test kit. Adjust it to the optimal range for your plants, typically around 5.5 to 6.5 pH. 5. Once the nutrient solution is mixed and pH adjusted, pour it into the reservoir, allowing it to disperse evenly among the growing containers. 6. Monitor the nutrient levels regularly and top up the reservoir as necessary to maintain the proper balance for optimal plant growth. Now that you have successfully set up your hydroponic system, you are ready to start growing your plants in a controlled and efficient environment. Remember to regularly monitor the system, adjust nutrient levels, and provide necessary maintenance to ensure your plants thrive and produce a bountiful harvest.Maintaining And Troubleshooting
Setting up a hydroponic garden involves maintaining and troubleshooting the system to ensure optimal plant growth. Regularly checking water pH levels, nutrient solution, and lights is crucial. Troubleshooting issues such as nutrient deficiencies and pests promptly ensures a successful hydroponic garden.
Maintaining and Troubleshooting Monitoring pH and EC Levels To ensure the success of your hydroponic garden, it’s crucial to monitor the pH and EC levels of the nutrient solution regularly. Maintain the pH level between 5.5 and 6.5 for most plants, and adjust it using pH up or down solutions. Similarly, keep an eye on the EC (electrical conductivity) level to ensure the right balance of nutrients for plant growth. Managing Pest and Disease Control Pests and diseases can wreak havoc on your hydroponic garden if left unchecked. Create a vigilant schedule for inspecting plants and take immediate action if you notice any signs of infestation or disease. Use natural remedies or organic solutions to minimize the impact on the environment. Checking and Adjusting Water Levels The water levels in your hydroponic system should be regularly checked and adjusted to ensure proper nutrition and oxygenation for your plants. Make sure that the roots are always submerged in the nutrient solution, and top up the water as needed to maintain the desired levels. Troubleshooting Common Issues Despite your best efforts, issues may arise in your hydroponic garden. Conduct regular visual inspections to identify problems such as wilting leaves, discoloration, or stunted growth. Troubleshoot any issues promptly to prevent long-term damage to your plants. [Start a new sentence and break the paragraph here. Keep it concise and to the point.] Remember, maintaining and troubleshooting in your hydroponic garden is essential to ensure the health and vitality of your plants. By diligently monitoring pH and EC levels, managing pest and disease control, checking and adjusting water levels, as well as promptly troubleshooting common issues, you can set yourself up for a successful and thriving hydroponic garden.
Credit: hellohomestead.com
:max_bytes(150000):strip_icc()/diy-hydroponic-systems-5093454-hero-e47eb8c4d31146ea90b44c18b7345807.jpg)
Credit: www.thespruce.com
Conclusion
Setting up a hydroponic garden can be a rewarding and sustainable way to grow your own produce. By following the steps outlined in this guide, you can create a thriving garden that yields fresh, healthy fruits and vegetables. With a little patience and dedication, you’ll soon be enjoying the fruits of your labor.